

Spring Home Brew!
Another exciting life happening! Ryan and I brewed a very small batch of beer two Saturdays ago in hopes that it would be ready in time to share with our family and friends for Easter weekend!
For those of you that don’t know, Ryan is the Head Brewer and Production Manager for Blowing Rock Brewing. He oversees both of our locations, Blowing Rock and Hickory, and works mainly at the Hickory location. His job includes brew scheduling, packaging, inventory, yeast management, and much more. He graduated from Appalachian State with a major in Fermentation Science and a minor in Chemistry. Ryan has been working for Blowing Rock Brewing since mid-2018.
Ryan and I met through work. When we met, I was working as General Manager of Blowing Rock Draft House (our Hickory location) and I have moved my way up within the company. I now work as the company wide Operations Manager, having a hand in three different divisions of the company. We both work very closely together on a daily basis as I act, more or less, as the liaison between the brewery and our front of house staff at both locations and I purchase all items needed on a weekly basis in order to produce the brews we make each week.
All introductory things aside…this is what we did a few weekends ago!
Ryan had the idea to come up with a Carrot Cake Gose (Go-Suh). A Gose is a more “gentle” sour in the brewing world. So, below I am going to do my best to walk you through the home brewing process of making this Carrot Cake Gose.
For context, Ryan typically brews on a 30 barrel system (930 gallons) and this home brew system produces 5 gallons of beer. Much different!
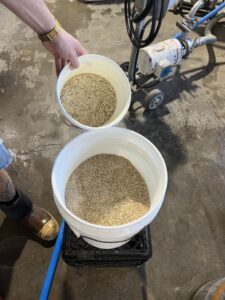
Here we are at the start of our process. Ryan has weighed out the grain needed for the brew. He ran the grain through a roller mill to just break the husk and expose the starchy endosperm, which is what will eventually convert into simple sugars. If the mill settings are incorrect, this can cause one of two things. If the mill setting is too loose, the husk will not break and less sugars will be converted. If the mill setting is too tight, it will create a powder and the mash will stick, making it almost like concrete. Having the correct mill setting is crucial to good sugar conversion and a smooth day of brewing beer!
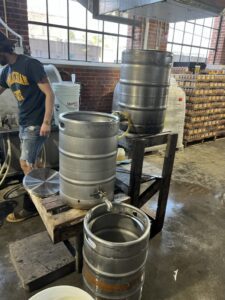
Here we have our set-up for the day. Highest tier is our HLT (Hot Liquor Tank). This is actually very hot water, approximately 175 degrees, and not liquor in any form. Middle tier is our Mash Tun which is where we add our grain and infuse with water from the HLT to create a “mash.” Our goal here is to have our mash rest at a desired temperature that the alpha amylase enzyme is most active. Alpha amylase is the enzyme found naturally in grain that breaks down long-chain polymer sugars into simple sugars so that the yeast added later will be able to metabolize into alcohol. The lowest tier is our Boil Kettle. This is where the wort (liquid grain sugar) is transferred after resting in the Mash Tun.
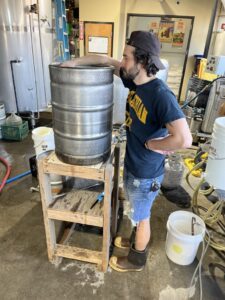
Ryan is checking the temperature of the HLT to ensure good strike temperature (approx. 175 degrees). Strike temperature is the temp. of the water once the grain has been added. Because the grain will naturally bring down the temp. of the water, we need to ensure the water temp is where we want it after adding grain.

At this point, we have completed our sugar rest and we are filling the Boil Kettle to 6 gallons. We do not have 6 gallons in the Mash Tun, so we have to sparge. Sparging is the process of pulling the sugars out of the grain by slowly adding water over the grain from the HLT. This is going on at the same time when still filling the Boil Kettle with wort. This home brew system is a 3-tiered gravity (the “fall down” kind) feed system. Once the Boil Kettle is filled to our desired volume, we will check our gravity (different from the “fall down” gravity that you’re thinking of). The gravity is a measurement of sugar in solution that can be checked by a saccharometer. Once all of this is where we’d like it to be, you bring your Boil Kettle to a boil. We used a propane tank and a burner.
 Once we achieve boil, we will add our hops and adjuncts at respective times. Although my photo quality is sub-par there are a small amount of hops in the second cup from right in this photo. You can note that there are not many hops at all as this was not meant to be a hop-forward beer. We added lactose and brown sugar as our adjuncts. Yeast nutrients were added to ensure yeast growth and whirlflocc (first cup on the right) was added to pull proteins out of solution (aka…making it not so hazy).
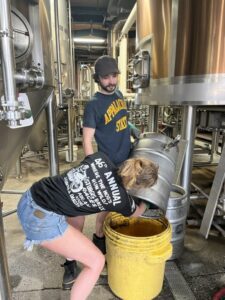 While the wort was coming to a boil, Ryan put me to work! I helped him grain out the Mash Tun. His recipe to success is to “clean as you cook!” This makes the end of the brew day much easier, as most of your cleaning is already complete. Fun fact…when we brew on our much larger system, all of the spent grain from the Mash Tun goes to a local dairy farmer for his cows! This small amount of grain was also given to him. We try very hard to be sustainable in any way we can!
Thirty minutes prior to end of boil, Ryan placed his heat exchanger in the Boil Kettle for sanitation. I wasn’t able to snap a photo, but the heat exchanger consists of a copper coil that we will later run cold water through that will absorb the heat from the boiling wort which in turn cools the wort before going into the sanitized fermenter.
 The boiling wort has cooled to our desired temperature and now we are gravity feeding into our fermenter. Once our fermenter is full, we will pitch (add) yeast. The yeast strain Ryan chose was a Philly Sour yeast strain by Lallemand. This yeast is genetically modified to finish fermenting, but still lowering the pH enough to make it taste sour.

Ryan has just pitched yeast and he is now vigorously shaking the fermentation vessel to introduce oxygen to the wort. Oxygen is important in the early stages of yeast growth as the yeast needs oxygen to grow. Once the oxygen is used up, the cycle switches to fermentation where the sugar is now converted to CO2, heat, and alcohol. Normally on a larger scale, the fermenters are jacketed to control fermentation temperature as it plays a vital role in ester production. However, we did not have the tools to utilize temperature control for our ferment on such a small scale. We put our blow-off on and let the yeast get to work!

A week later fermentation was pretty much complete so we added our extra adjuncts as a dry-hop. Our extra adjuncts were carrot juice, vanilla beans, and cinnamon graham crackers. These ingredients will sit for a few days.
Twenty-four hours before we need to transfer to a keg, Ryan will add some fining solution to add clarity and he will place the fermentation vessel into the cooler so that solids can fall out of solution. The next day, he will transfer to a keg, hook it up to CO2, and force carbonate.

Today (Tuesday, 4/4) we were able to grab a sample. Look at that beautiful color!!
As we said before, this brew still has a few more days, but it already tastes so good! I can’t wait to try the finished product!
Stay tuned to find out if this brew works out and tastes the way we imagined!
*This blog post would not have been possible without Ryan’s knowledge! I find it fun and enjoyable to join him on projects like these, but this is what he does for a career everyday! Shameless gush….but he is one of the smartest people I’ve ever met and is so passionate about his work. While these home brews are just for fun and maybe do not turn out the way he or we would like, Ryan + the Blowing Rock Brewing team does make some incredible beer on the regular! If you’ve never had any of our brews, stop in to say hello and grab a pint. We’d love to have you!
Cheers and Hoppy Easter to you all!